Self-Driving Car
 This article will highlight how (Deep) Reinforcement Learning may be used to tackle difficult problems, such as enabling an agent to drive independently without hitting other objects. Since this essay is a synopsis of an academic project, I won't go into great detail about the Unity environment because the fundamentals are covered in a number of online courses.
TechnologiesThe project relies on Unity and its potent module MLAgents since the objective was to build a 3D environment and apply sophisticated Deep Reinforcement Learning algorithms. As needed by Unity, all scripts are written in C#.The Agent The agent is a straightforward four-wheeled automobile model from Racing Kit. The controls and sensors were created based on this. In order to get a perfect movement both during and after the training period, both are necessary. From a scripting standpoint, CarDriver.cs, which is tied to the vehicle, has all of the control's logic. In contrast, Unity manages the sensors after they have been setup.
Control The way an agent moves in a certain environment is typically referred to as being under "control." The colliders should be discussed first. A collider is just a means to wrap close to an actual object to react to actual collisions.  As a result, each wheel includes a collider to sense the road and react to external forces. The body also features a collider to detect impacts with objects like walls and other vehicles.
There are several ways to establish a vehicle control. In this instance, the relevant wheels receive two forces—a motor force and a steering force—that are applied to them (more precisely, to their colliders). The driving wheels and the steering wheels may be selected in the Unity Inspector of the automobile object. The function FixedUpdate(), which is found in CarDriver.cs and is run numerous times every frame based on a separate interval, contains all the logic for the movement. As a result, in this function, a specific force, such as a motor or steering force, is applied to each wheel.
 Looking at the script will show you that when the motor force input is zero, the brake is implemented using a different number. That’s it. The wheels may now be controlled and seen turning on the automobile (like an Ackermann steering).
 Sensor
Just a few sensors are required to detect the three primary objects in the scene—cars, walls, and checkpoints—and to finish the movement. RayPerceptionSensorComponent3D, a Unity-built component, defines a sensor with an origin point. Numerous additional options, like the number of raycasts in each direction, are also selectable.
 The automobile model is equipped with three sensors. I added colours to each of them to make it easier to understand: the blue sensor represents the walls and the automobiles, while the red and orange sensors represent the checkpoints.
 Additional observations:
A crucial training step is to define the observations. Unity is responsible for managing all sensor observations because they are already inputs to the neural network. In addition, we've included six more observations: three for the velocity vector and three for the distance from the automobile to the following checkpoint. Since these parameters are arbitrary, you should be aware of the learning environment and pick your observations in accordance with the data the agent will require to complete the task. Learning We can create the training track and the testing track once the agent has been set up with a control and a few sensors. With order to aid in generalization, the former is more complicated.   The board is only a means of displaying some data regarding the lap timings. There are undetectable checkpoints on both tracks that are utilized to maintain direction. This is known as a checkpoint system.
 If the automobile passes the right checkpoint, it receives a prize. On the other hand, it receives poor rewards if it hits a wall, hits another car, or just makes an observation. The latter is useful for accelerating the lap and preventing the automobile from remaining in one place. Depending on whether a car completes the lap, the episode concludes after a certain number of steps. Finally, since their actions have an impact on the model update, many agents are taken into account.
Deep RL algorithms PPO and SAC are available as Deep RL algorithms in the MLAgents package. To determine which was most appropriate for our job, both were employed. Overall, there are a few empirical factors that may be taken into account while making a decision. For instance, PPO is more stable and learning occurs more quickly; SAC is more suited to slow step environments and is sample efficient. 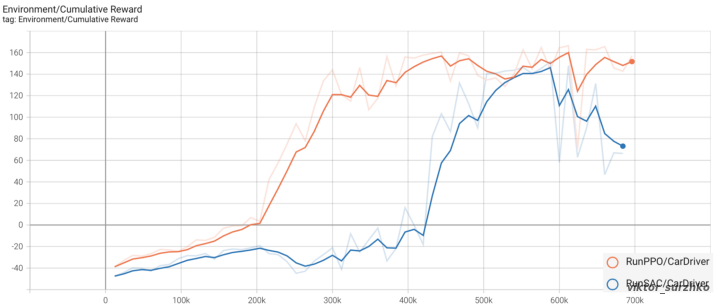 On a comparison of 700.000 steps, the cumulative prize is the sole factor taken into consideration. As you can see from the graph, the PPO curve constantly rises above the SAC curve, which begins to be positive only at step 420.000. In addition, PPO has an end time of 22 minutes as opposed to 1h 21m for SAC. The conclusion was that PPO works out to be the best since it is possible to achieve good outcomes with a learning period of 22 minutes.
The final assessment for determining the testing track's best generalization is shown below. The PPO model is in the orange automobile, whereas the SAC model is in the white car. As you can see, the orange one is speedier and more able to move quickly despite its starting location.  Thank you for reading the Self-Driving Car article.
| |
| Views: 996 | |
| Total comments: 0 | |
